Not much of an update, but I stumbled across old photos of my ’92 F150 (and canoe.) Didn’t think I kept any, I didn’t own it for long before I traded it for an Explorer.


Not much of an update, but I stumbled across old photos of my ’92 F150 (and canoe.) Didn’t think I kept any, I didn’t own it for long before I traded it for an Explorer.
I’ve been planning to start work on the RX-7, but first I needed to clear another project out of the garage. I have a Honda Nighthawk 650 with a bad ticking noise coming from the top end of the engine. It sat for a while before it developed the noise, so I was pretty sure air had made it’s way into one the of the hydraulic tappets. The fix was easy, but getting to the tappet meant pulling the valve cover as well as the upper part of the bike.

Halfway done
I made a short video for anyone else who runs into the same problem, finding the right procedure to bleed the tappet was hard to find on youtube.
Now that the bike is back together and running great, I’m out of excuses to avoid working on the RX-7. First up is the roof, body work supplies are already starting to arrive.
The road trip was a success and the RX-7 is back in Colorado! And more importantly, the T100 didn’t self destruct on the drive.

The RX-7 in tow.
Overall retrieving the RX-7 went better than expected. Other than a layer of mold and pine sap covering the surface of the car, it doesn’t seem to have suffered much from sitting outside. I put it down to it sitting on pavers in relative shade, but maybe I was just lucky. When prepping for the tow home, the exhaust and driveshaft even came off easily and the tires held air just fine. The interior is pretty much how I left it, no dash cracks or new smells (just the usual old Japanese car mustiness.)
The dolly turned out to be the right choice, the extra weight of a full trailer would have been a struggle once the T100 started gasping at higher elevations. Even with the lighter weight there was a moment in Iowa when the A/T Temp light came on, though that might have been down to user error. Overdrive had been working well earlier in the trip, but something about the heat, elevation, or gradual upward grade kept the torque converter from locking in 4th gear on that stretch of road. Turning off overdrive brought the temp back down for the rest of the drive.
It was a miserably long drive, but it was worth it to drag the RX-7 into a car wash for the first time in nearly a decade. The mold washed right off and it’s now looking like the car I’ve been daydreaming about since I was 19.

Before and after.
For a full walk around of the car, see the video embedded below. The first step, which will take a while, will be addressing the body damage and rust. So far everything looks fixable, though fixing the paint will eventually mean a full respray. For now that’s in the distant future and hopefully I can get away with spot repairs in the short term.
This weekend I’ll be heading out on a 4000 mile road trip to tow back the Rx-7. The truck has been running well, but it’s as good an excuse as any to finish up some of the projects I’ve been putting off. The first has been sorting out the electrical system in the bed. I had a spare battery in back when I had the camper in place, but with the topper installed the battery is now in the “living” area. Instead of trying to rig up a sealed box and external vent, I’m planning on moving the second battery under the hood instead. That will require building a new battery tray, so in the mean time I just ran power back from the main battery to a fuse panel and removed the second battery entirely. I’ll have to be careful not to kill it, so for the moment it’s only powering a light and cigarette lighter socket, a fan and inverter will have to wait.
While I was messing with the wiring, I installed the backup camera I bought a while back to replace the one that left with the Four Wheel Camper. It was another cheap ebay camera, however this one must have been meant to mount under a bumper or other lip. I made a mount out of a spare piece of aluminum, but the angle still isn’t great. I’ll see how it works on the trip, but I may end up replacing it.

Good enough?
Next on the list was to build a shelf over the front part of the bed. The idea is to have a place to store camping gear while leaving space for a mattress underneath. I considered a platform with drawers instead, but decided to go for something simple this time. I made it out of 5/8″ plywood with an aluminum L channel to brace the front. I think it came out pretty nice.

Storage for the topper
With the slope of the cap, it’s a tight fit between the bed rails and won’t be coming out any time soon. But so far it looks like it’ll work to keep everything out of the way.
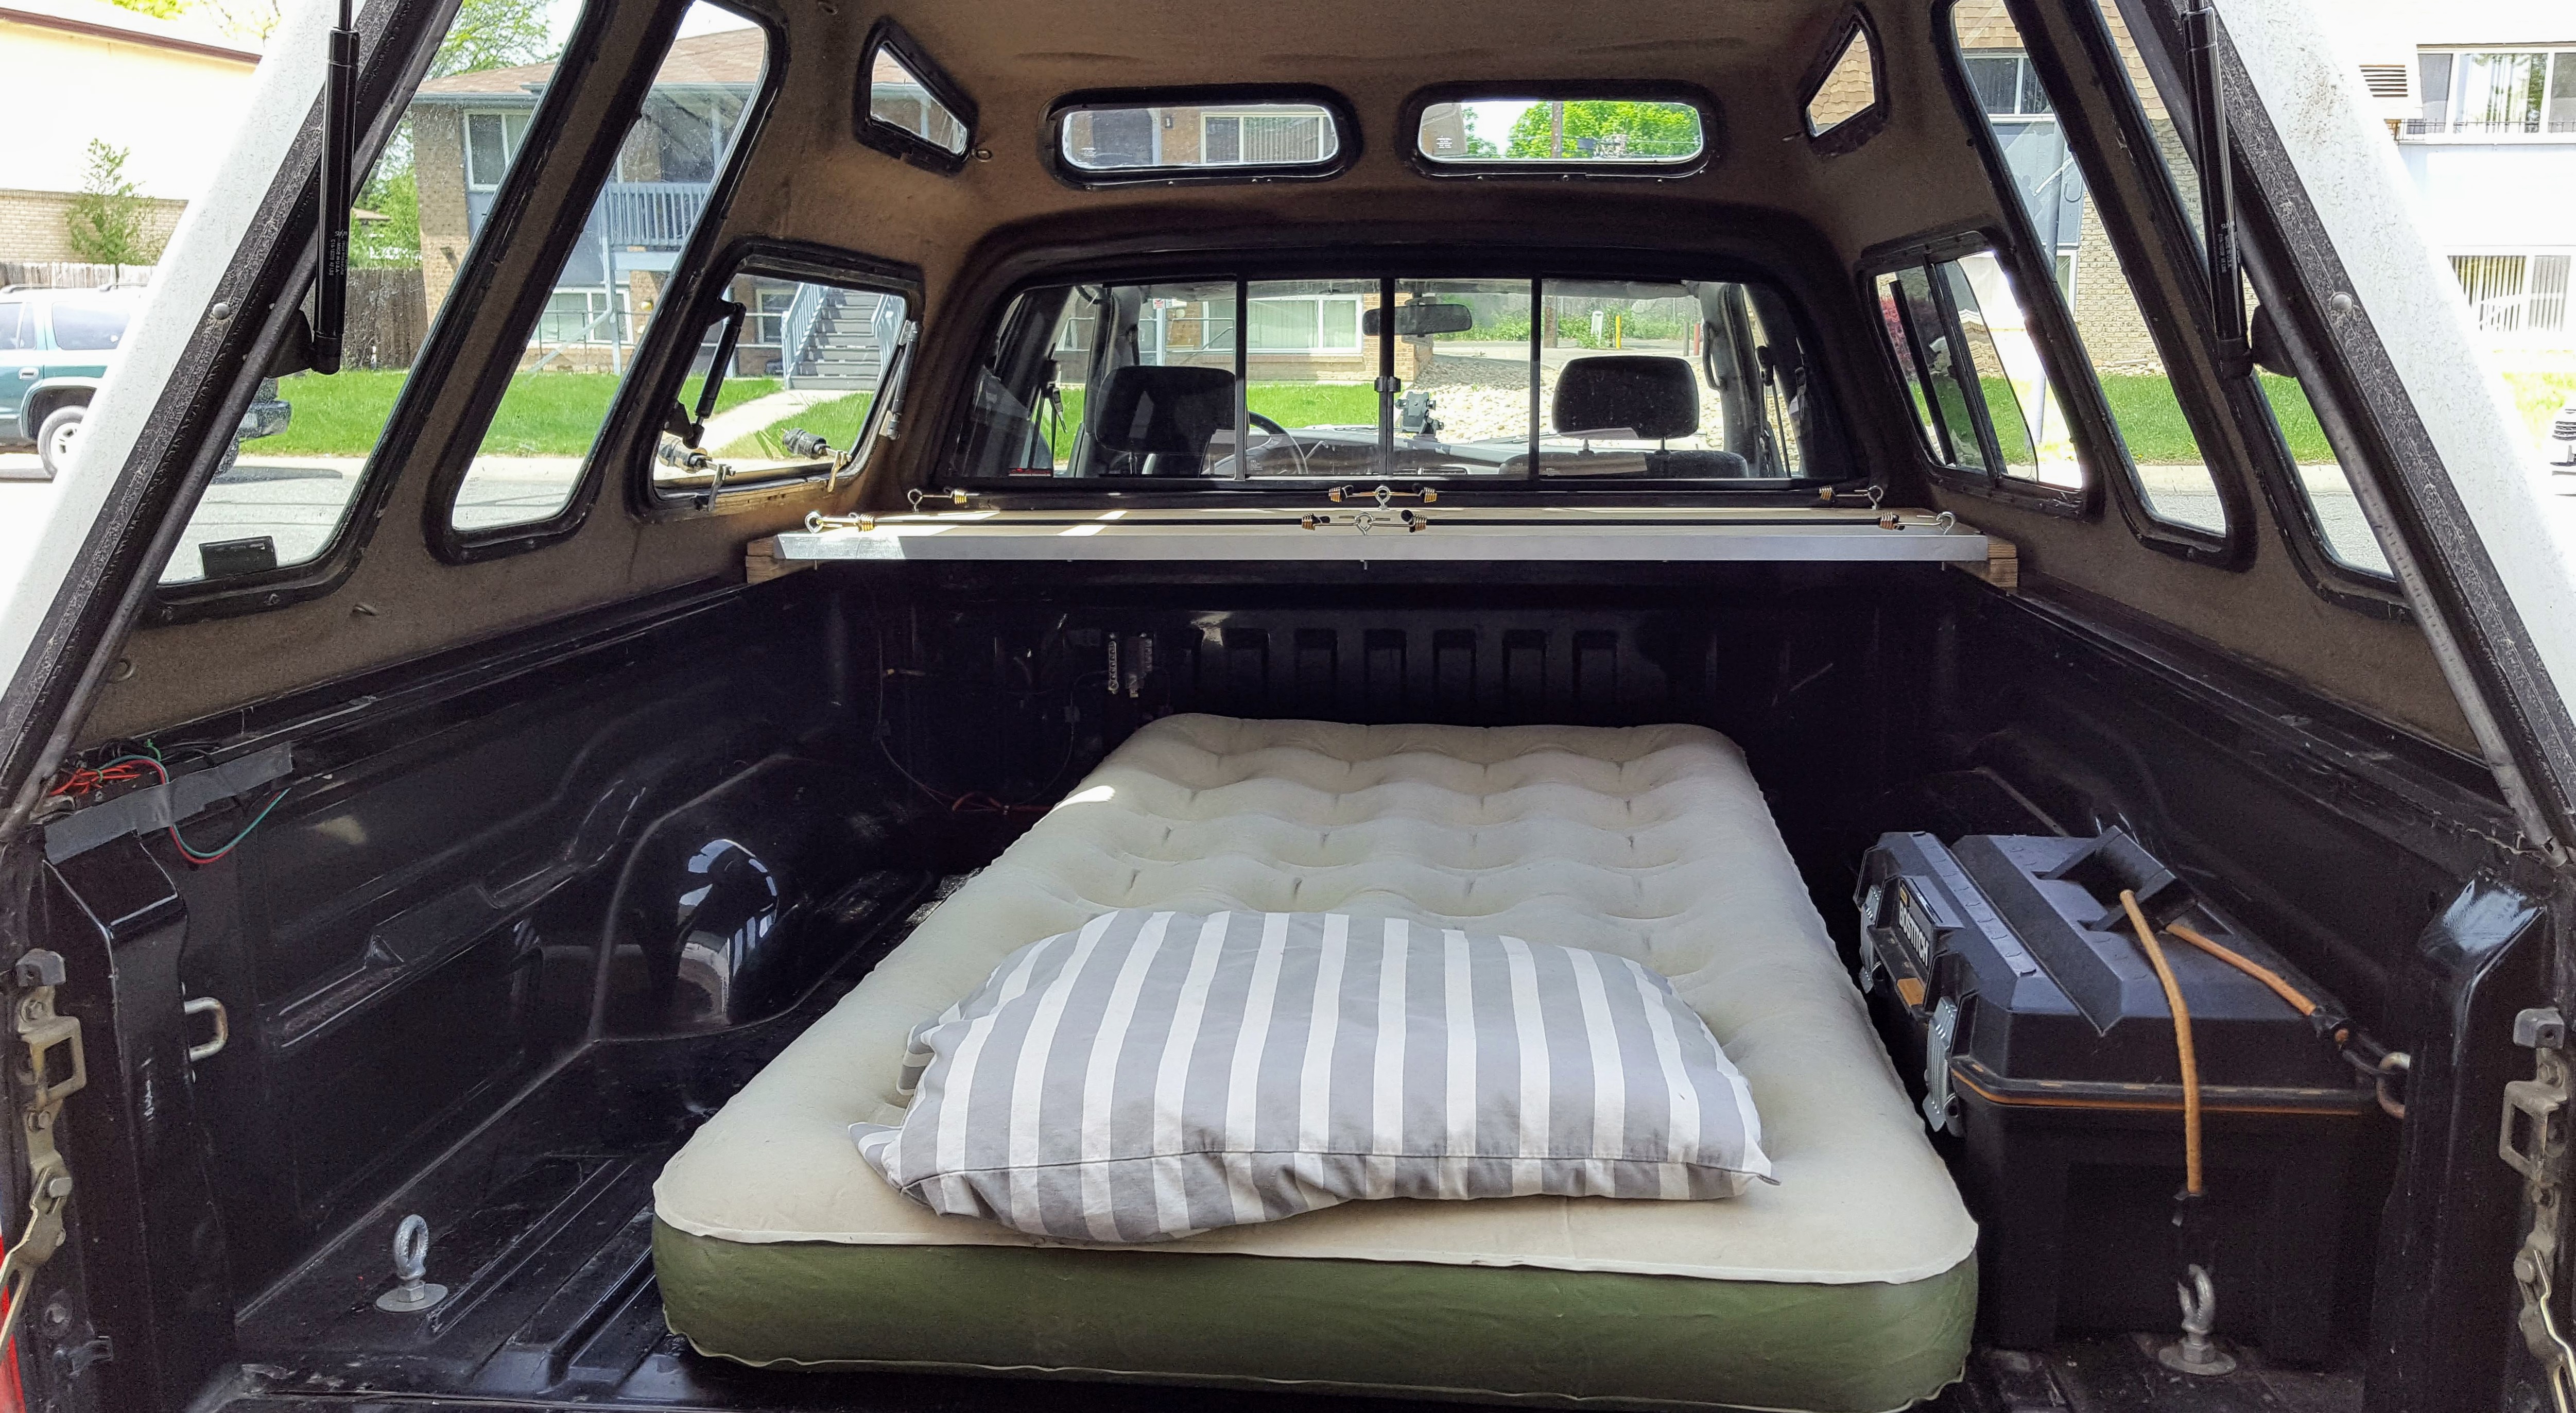
Comfy.
I’ve been planning a trip back East to retrieve my RX-7, however the big unknown has been the condition of the car. I parked it six years ago under a car shelter, which then proceeded to collapse after a heavy snow. I visited it fairly soon after that happened and pulled the destroyed shelter off of it, but it’s been out in the elements and I’ve been across the country since then. I’ve been renting out the property it’s parked on so it hasn’t been easy to get updates on it.
So I was excited to finally receive these pictures from the property management company. At first glance it still looks like it’s in one piece.
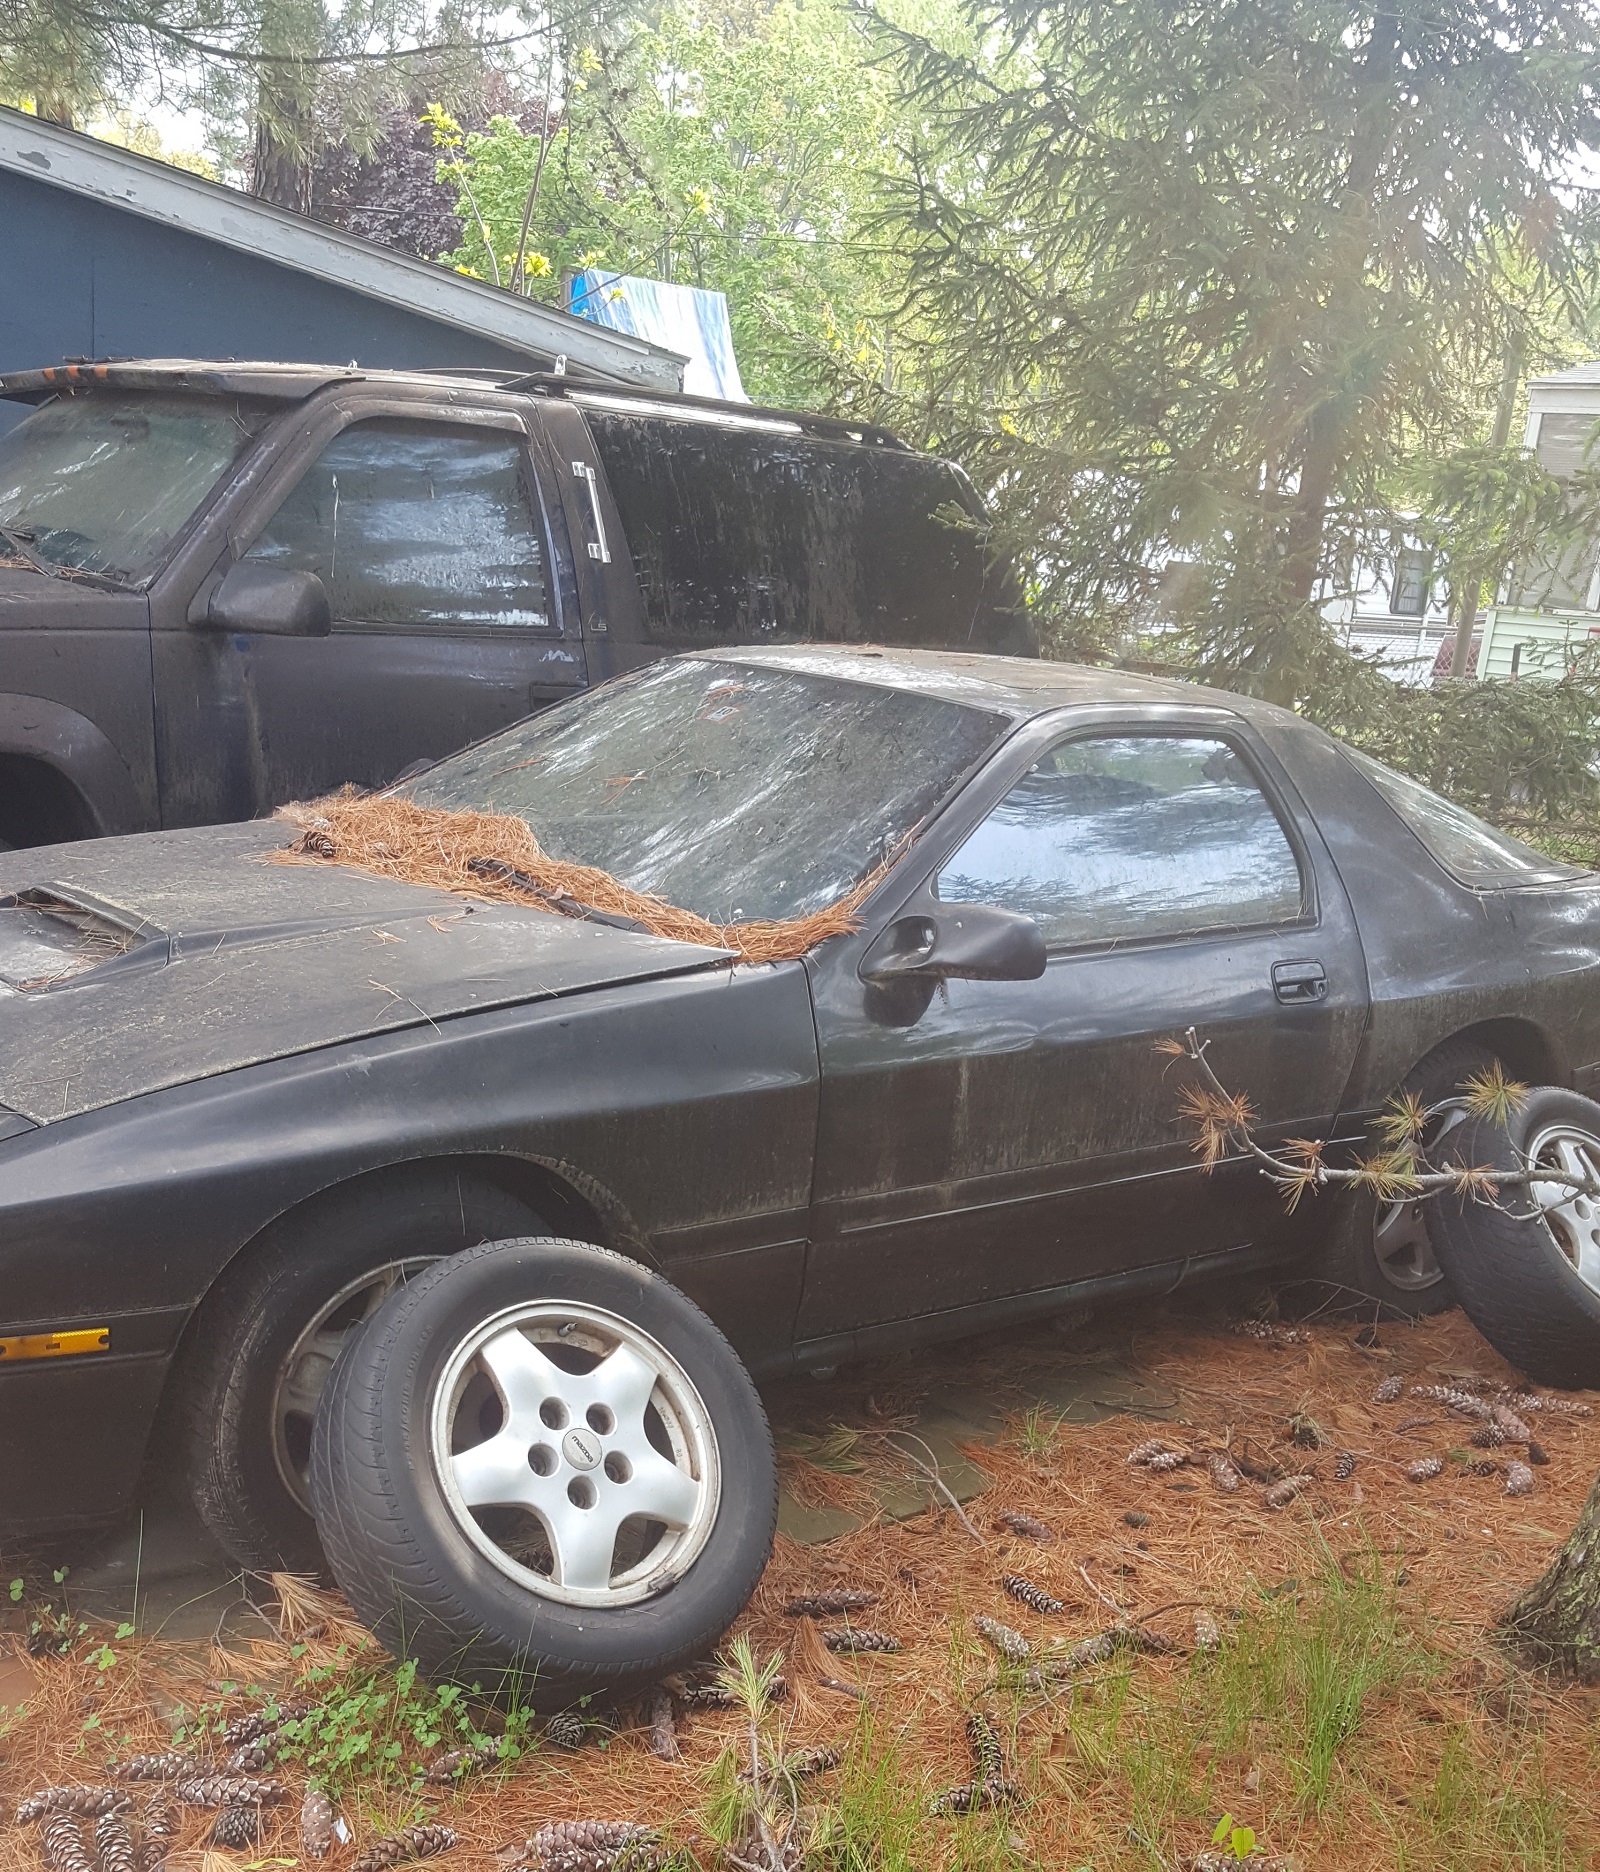
Filthy, but intact
I think I can even convince myself the tires are still holding air. The spare two next the car were in storage and had new-ish tires on them when I parked it. With any luck they’ll be in decent enough shape so I can use a dolly to haul the car back instead of requiring a full trailer. Here’s another picture from the front, though it doesn’t show much more detail other than the desperate need for a wash.

Very Filthy.
All in all it looks fairly similar to how it did when I parked it. It wasn’t the cleanest then either.

The RX-7 in 2012
The T100 has always it’s share of squeaks and rattles, but lately it’s crossed the line for even a 25 year old truck. Two problems in particular were getting worse. The first was a noise from under the hood that sounded similar to the ticking noise from an exhaust leak. The problem was it was coming from the left side of the engine, opposite the exhaust. When I had the manifolds off for the head gasket repair I checked them for cracks, so I was fairly certain it wasn’t leaking from there. I could only hear it under load so I could never identify where it was coming from by sticking my head under the hood. Finally I gave up last week and went to a local Toyota shop to see if they could figure it out. A half hour of labor later they came back with the diagnoses of a cracked heat shield. No exhaust leak after all, just a rattle that was in time with the exhaust pulse. I took it back home and added a hose clamp to keep the heat shield in place.

Problem Solved.
The next noise was a constant squeaking from the rear of the truck whenever I went over a bump…or when I slowed down…or accelerated. This was easier to identify. The rear leaf spring bushings were shot. They were in bad shape last year when I installed the add-a-leaf, and half a year of carrying a camper only made them worse. Below is a 360 video of the bushing replacement.
Continuing to fill in the gaps to the CarBIO listed off to the left. This time around it’s the Lincoln Mark VIII.
It’s been a slow winter for the T100. With the camper gone it’s been serving as my daily driver, but with Spring just about here I’ve been thinking about setting it up for longer trips again. Since I won’t be spending as much time in it as last year, a full camper would be overkill and instead I’ve been keeping an eye out for a cheap shell for the bed. I finally lucked out and found this ARE topper on craigslist:

ARE Cap on the T100
It came off of a 270k mile T100 and needs some maintenance, but it has some great features for a camper shell. Came with a carpeted interior, compression boot where it meets the cab, hinged window on the left, and a slider on the right. The downside to it is the height. I had hoped for a flush shell, but for $200 I can’t complain. I also need to do something about the paint. At a minimum the white paint needs to be touched up, but I’m considering a full repaint to match the truck. Would look better, but I might regret it in the heat.
There’s a new page on the left covering the Mazdaspeed 3 I bought back in 2007. I was terrible at taking pictures back then, but I did manage to dig up a couple old track day videos, be sure to check them out.
I’ve been living full time out of the Phoenix camper for the last few months, but with winter on the way I’ve settled back into an apartment. Since it wasn’t looking like I would get much of a chance to use the camper next year, I decided to sell it and go with something lighter weight for the T100. Should also mean a return of the trail videos. While the T100 was still fairly capable with the camper on the back, it never felt stable enough to really push the truck off-road.
Here’s a 360 video with a short tour of the camper from before I sold it:
The buyer loaded it onto a four door 2nd gen Tacoma, which handled the weight and size surprisingly well. While I’m sad to see it go, with cash in hand I’m already planning the next upgrades to the T100. Bumper, sliders, winch or is it finally time for a locker?

Loading the Phoenix with terrifying old-school FWC jacks